

Pre-requisites
In order to use letsencrypt for local development, you will need to have a domain that you own and have access to the dns records.
If you don’t have a domain yet there are many providers that offer domains for free or for a small fee. I personally use namecheap and namesilo for my domains, but there are many others. If you are an AWS user, you can also use Route53 to manage your domains.
Certbot
In order to use letsencrypt for local development, we will be using certbot. Certbot is a tool that can be used to obtain and install certificates from Let’s Encrypt.
Certbot can be installed on many platforms, but in this example we will be using the docker image, and we will be using the dns challenge, which means that we will be using the dns records to prove that we own the domain.
In order to automate the dns challenge we will be using the certbot-dns-route53 plugin for certbot in order to automate the dns challenge, which means it will require access to the aws credentials in order to update the dns records.
IAM User for Certbot
In order to use the certbot-dns-route53 plugin, we will need to create an IAM user with the following permissions:
1
2
3
4
5
6
7
8
9
10
11
12
13
14
15
16
17
{
    "Version": "2012-10-17",
    "Statement": [
        {
            "Sid": "Certbot",
            "Effect": "Allow",
            "Action": [
                "route53:ChangeResourceRecordSets",
                "route53:GetChange",
                "route53:ListResourceRecordSets"
            ],
            "Resource": [
                "arn:aws:route53:::hostedzone/<hostedzone_id>"
            ]
        }
    ]
}
And in order to make our solution reusable we will be using terraform to create the IAM user and the policy and create a module that we can use in our projects.
So first we need to create a folder to contain our module, name it whatver you want as in the end of this post I’ll be linking a repo with the module ready to use.
So let’s first create a file to contain our iam logic. We will be naming it iam.tf
So, under iam.tf file, let’s create the IAM user and attach the policy to it, but we will be doing this using terraform.
1
2
3
4
5
6
7
8
// Create a iam user with permissions to make changes to the hosted zone record sets, the subdomain hosted zone only if subdomain is not empty or the domain hosted zone if subdomain is empty
resource "aws_iam_user" "certbot_route53" {
  name = "certbot_route53"
  path = "/certbot/"
  tags = {
    Name = "certbot_route53"
  }
}
We will need to create an access key for the user, so we can use it in our local development environment.
1
2
3
4
// Create an access key for the user
resource "aws_iam_access_key" "certbot_route53" {
  user = aws_iam_user.certbot_route53.name
}
We will also then need to create the policy and attach it to the user.
If we just want to have a domain or later a subdomain we will need to have the logic in our certbot-route53 module to either attach a policy for the subdomain or the domain.
1
2
3
4
5
6
7
8
9
10
11
12
13
14
15
16
17
18
19
20
21
22
23
24
25
26
27
28
29
30
31
32
33
34
35
36
37
38
39
40
41
42
43
44
45
46
47
48
49
50
51
52
53
54
55
56
57
58
59
60
61
62
63
64
65
66
67
68
69
70
71
72
73
74
75
76
77
78
79
80
81
82
83
84
85
86
87
88
89
90
91
// Create a policy to allow the user to make changes to the hosted zone record sets for the domain hosted zone
resource "aws_iam_policy" "certbot_route53_domain" {
  count       = var.subdomain == "" ? 1 : 0
  name        = "certbot_route53"
  description = "Policy to allow the user to make changes to the hosted zone record sets, the subdomain hosted zone only if subdomain is not empty or the domain hosted zone if subdomain is empty"
  policy = jsonencode(
    {
      "Version" : "2012-10-17",
      "Statement" : [
        {
          "Sid" : "AllowCertbotRoute53",
          "Effect" : "Allow",
          "Action" : [
            "route53:ChangeResourceRecordSets",
            "route53:ListResourceRecordSets",
            "route53:GetHostedZone",
          ],
          "Resource" : [
            "arn:aws:route53:::hostedzone/${aws_route53_zone.domain.zone_id}",
          ]
        },
        {
          "Sid" : "AllowCertbotRoute53ListHostedZones",
          "Effect" : "Allow",
          "Action" : [
            "route53:ListHostedZones"
          ],
          "Resource" : [
            "*",
          ]
        },
        {
          "Sid" : "AllowCertbotRoute53GetChange",
          "Effect" : "Allow",
          "Action" : [
            "route53:GetChange"
          ],
          "Resource" : [
            "arn:aws:route53:::change/*",
          ]
        }
      ]
  })
}

// Create a policy to allow the user to make changes to the hosted zone record sets for the subdomain hosted zone
resource "aws_iam_policy" "certbot_route53_subdomain" {
  count       = var.subdomain == "" ? 0 : 1
  name        = "certbot_route53"
  description = "Policy to allow the user to make changes to the hosted zone record sets, the subdomain hosted zone only if subdomain is not empty or the domain hosted zone if subdomain is empty"
  policy = jsonencode(
    {
      "Version" : "2012-10-17",
      "Statement" : [
        {
          "Sid" : "AllowCertbotRoute53",
          "Effect" : "Allow",
          "Action" : [
            "route53:ChangeResourceRecordSets",
            "route53:ListResourceRecordSets",
            "route53:GetHostedZone",
            "route53:GetChange"
          ],
          "Resource" : [
            "arn:aws:route53:::hostedzone/${aws_route53_zone.subdomain[0].zone_id}",
          ]
        },
        {
          "Sid" : "AllowCertbotRoute53ListHostedZones",
          "Effect" : "Allow",
          "Action" : [
            "route53:ListHostedZones"
          ],
          "Resource" : [
            "*",
          ]
        },
        {
          "Sid" : "AllowCertbotRoute53GetChange",
          "Effect" : "Allow",
          "Action" : [
            "route53:GetChange"
          ],
          "Resource" : [
            "arn:aws:route53:::change/*",
          ]
        }
      ]
    }
  )
}
So now that we have the policy for either the domain or the subdomain, we will need to attach it to the user.
1
2
3
4
5
6
// Attach the policy to the user based on the value of the variable subdomain
resource "aws_iam_user_policy_attachment" "certbot_route53_domain" {
  user       = aws_iam_user.certbot_route53.name
  policy_arn = var.subdomain != "" ? aws_iam_policy.certbot_route53_subdomain[0].arn : aws_iam_policy.certbot_route53_domain[0].arn
}
Creating a hosted zone dedicated for local development
In order to keep our local development environment isolated from our production environment, we will be creating a dedicated hosted zone for our local development environment.
This will allow us to create several subdomains for our local development environment, and we will be able to use the same domain for all of our local development environments.
In my case I have a domain called runbook.codes and I will be creating a hosted zone for it. And this will be the domain in the following examples.
Let’s first create a file to contain our hosted zone logic. We will be naming it route53.tf
However we want to make this module reusable, so we will be using a variable to pass the domain to the module.
1
2
3
4
5
6
7
8
// Create a hosted zone for domain in variable domain
resource "aws_route53_zone" "domain" {
  name    = var.domain
  comment = "Hosted zone for ${var.domain}"
  tags = {
    Name = var.domain
  }
}
You could also want to be creating another hosted zone for the subdomain local.runbook.codes that will server all subdomains for your local development environment. In our module we will be allowing you to create a subdomain hosted zone, and if you don’t want to create one, you can just pass an empty string to the variable subdomain.
This way you could be using the hosted zone, let’s say local.runbook.codes for all your local development environments, and will be able to create several subdomain without polluting the TLD.
So in order to use a subdomain hosted zone, we will need to create a delegation set for it to allow the subdomain to be managed by the parent domain, setting the authoritative nameservers for the subdomain.
So let’s add the subdomain logic and the NS records for the subdomain hosted zone in our domain hosted zone.
1
2
3
4
5
6
7
8
9
10
11
12
13
14
15
16
17
18
19
// Create a hosted zone for subdomain in variable subdomain if subdomain is not empty
resource "aws_route53_zone" "subdomain" {
  count   = var.subdomain == "" ? 0 : 1
  name    = var.subdomain
  comment = "Hosted zone for ${var.subdomain}"
  tags = {
    Name = var.subdomain
  }
}

// If subdomain is not empty, create a NS record in the domain zone for the subdomain zone
resource "aws_route53_record" "subdomain_ns" {
  count   = var.subdomain == "" ? 0 : 1
  zone_id = aws_route53_zone.domain.zone_id
  name    = var.subdomain
  type    = "NS"
  ttl     = "172800"
  records = aws_route53_zone.subdomain[0].name_servers
}
This will only be created if the variable subdomain is not empty.
Variables and outputs for the module
In our variables file, we will be adding the following variables:
1
2
3
4
5
6
7
8
9
10
11
12
13
14
15
16
17
18
variable "region" {
  default = "us-east-1"
  type    = string
}

variable "profile" {
  default = "default"
  type    = string
}

variable "domain" {
  type = string
}

variable "subdomain" {
  default = ""
  type    = string
}
In our outputs file, we will be adding the following outputs:
1
2
3
4
5
6
7
8
9
10
11
12
13
14
15
16
17
18
19
20
21
22
23
24
25
26
27
28
29
30
31
// Return iam user credentials
output "certbot_route53_access_key" {
  value       = aws_iam_access_key.certbot_route53.id
  description = "The access key id of the certbot_route53 user"
  sensitive   = true
}
output "certbot_route53_secret_key" {
  value       = aws_iam_access_key.certbot_route53.secret
  description = "The secret access key of the certbot_route53 user"
  sensitive   = true
}
// Return the hosted zone id of the domain
output "domain_hosted_zone_id" {
  value       = aws_route53_zone.domain.zone_id
  description = "The hosted zone id of the domain"
}
// Return the hosted zone id of the subdomain
output "subdomain_hosted_zone_id" {
  value       = var.subdomain == "" ? "Not Created" : aws_route53_zone.subdomain[0].zone_id
  description = "The hosted zone id of the subdomain"
}
// Return the name servers of the domain
output "domain_name_servers" {
  value       = aws_route53_zone.domain.name_servers
  description = "The name servers of the domain"
}
// Return the name servers of the subdomain
output "subdomain_name_servers" {
  value       = var.subdomain == "" ? "Not Created" : aws_route53_zone.subdomain[0].name_servers
  description = "The name servers of the subdomain"
}
We are also missing a provider for the module, so let’s add it to our main.tf file.
1
2
3
4
provider "aws" {
  region  = var.region
  profile = var.profile
}
Ok, so now we have our module ready, let’s apply it and see what we get.
1
2
terraform init
terraform apply
We should now have access to the credentials for the user certbot_route53 and the hosted zone NS records for the domain and the subdomain if we created one.
We can now make changes to our registrar to point the domain to the hosted zone with our NS records.
Installing certbot for route53 dns challenge
In order for certbot to be able to create a dns challenge in route53, we will need to install the certbot-dns-route53 plugin.
Via pip:
1
pip install certbot-dns-route53
Or using certbot-dns-route53 docker image:
1
docker run -it --rm certbot/dns-route53
Configuring certbot for route53 dns challenge
Now that we have the plugin installed, we need to configure it with the credentials for the user certbot_route53 that we created in our module.
Let’s export the credentials as environment variables:
1
2
export AWS_ACCESS_KEY_ID=$(terraform output -raw certbot_route53_access_key)
export AWS_SECRET_ACCESS_KEY=$(terraform output -raw certbot_route53_secret_key)
Let’s also export the domain and the email that we will be using for the certificate:
1
2
export DOMAIN=*.runbook.codes
export EMAIL=some_email@some.tld.com
Using certbot to create a dns challenge in route53
Now that we have our hosted zone ready, we can use certbot to create a dns challenge in route53 and get a certificate for our domain, that we can then use in our local development environment.
Let’s create a wildcard certificate for our domain, using certbot with route53 dns challenge.
For this example, we will be using the domain runbook.codes and we will be using the docker image certbot/dns-route53 to run certbot.
First let’s create a directory to store the certificates and the logs
1
mkdir -p letsencrypt/{etc,var/log,var/lib,var/www}
Then we can run certbot to create the certificate via the docker image mapping the volumes to the directories we just created:
In order to make emitting certificates easier, let’s create a script to run certbot in docker with all the parameters we need in our module folder the route53 dns challenge.
1
2
3
4
5
6
7
8
9
10
11
12
13
14
15
16
17
18
19
20
21
22
23
mkdir -p letsencrypt/{etc,var/log,var/lib,var/www}
export AWS_ACCESS_KEY_ID=$(terraform output -raw certbot_route53_access_key)
export AWS_SECRET_ACCESS_KEY=$(terraform output -raw certbot_route53_secret_key)
export DOMAIN="*.$1"
export EMAIL=local@$1.com

docker run -it --rm \
  -v $PWD/letsencrypt/etc:/etc/letsencrypt \
  -v $PWD/letsencrypt/var/lib:/var/lib/letsencrypt \
  -v $PWD/letsencrypt/var/log:/var/log/letsencrypt \
  -v $PWD/letsencrypt/var/www:/var/www/letsencrypt \
  -e AWS_ACCESS_KEY_ID=$AWS_ACCESS_KEY_ID \
  -e AWS_SECRET_ACCESS_KEY=$AWS_SECRET_ACCESS_KEY \
  -e DOMAIN=$DOMAIN \
  -e EMAIL=$EMAIL \
  certbot/dns-route53 \
  certonly \
  --dns-route53 \
  --dns-route53-propagation-seconds 60 \
  --agree-tos \
  --email ${EMAIL} \
  --server https://acme-v02.api.letsencrypt.org/directory \
  -d ${DOMAIN}
So we can run it like this:
1
2
chmod +x letsencrypt.sh && \
./letsencrypt.sh runbook.codes
Ok, so after running the script, we should have an output similar to this:
1
2
3
4
5
6
7
8
9
10
11
12
13
14
15
16
Requesting a certificate for *.runbook.codes

Successfully received certificate.
Certificate is saved at: /etc/letsencrypt/live/runbook.codes/fullchain.pem
Key is saved at:         /etc/letsencrypt/live/runbook.codes/privkey.pem
This certificate expires on 2023-05-18.
These files will be updated when the certificate renews.

NEXT STEPS:
- The certificate will need to be renewed before it expires. Certbot can automatically renew the certificate in the background, but you may need to take steps to enable that functionality. See https://certbot.org/renewal-setup for instructions.

- - - - - - - - - - - - - - - - - - - - - - - - - - - - - - - - - - - - - - - -
If you like Certbot, please consider supporting our work by:
 * Donating to ISRG / Let's Encrypt:   https://letsencrypt.org/donate
 * Donating to EFF:                    https://eff.org/donate-le
- - - - - - - - - - - - - - - - - - - - - - - - - - - - - - - - - - - - - - - -
And we should have a certificate in the letsencrypt/etc/live/runbook.codes folder.
Creating a record in route53 that points to localhost in order to use the certificate
We have seen how to create a route53 record in our previous post, so we will not go into detail here on how it works.
If we create a local record via terraform, we can use the certificate in our local development environment.
Let’s add a new file named record.tf to our module folder and add the following code:
1
2
3
4
5
6
7
resource "aws_route53_record" "local_record" {
  zone_id = var.subdomain == "" ? aws_route53_zone.domain.zone_id : aws_route53_zone.subdomain[0].zone_id
  name    = var.subdomain == "" ? "${var.local_record_name}.${var.domain}" : "${var.local_record_name}.${var.subdomain}"
  type    = "A"
  ttl     = "300"
  records = ["127.0.0.1"]
}
So now it will create a record in either the domain or the subdomain hosted zone, depending on if we are using a subdomain or not by the name of local_record_name and the type of A with the value of 127.0.0.1 pointing to our local machine.
If we just terraform apply, we should see the record created in route53.
In our case, we will be using the runbook.codes domain and the ilhicas subdomain, so we will be creating a record in the ilhicas.runbook.codes hosted main domain zone.
Using the certificate in our local development environment
We will just be running a python http server in our local machine, so we can test that the certificate is working.
Let’s create a new file named cert_tester.py and add the following code:
1
2
3
4
5
6
import http.server
import ssl

httpd = http.server.HTTPServer(('', 443), http.server.SimpleHTTPRequestHandler)
httpd.socket = ssl.wrap_socket(httpd.socket, certfile='./letsencrypt/etc/live/runbook.codes/fullchain.pem', keyfile='./letsencrypt/etc/live/runbook.codes/privkey.pem', server_side=True)
httpd.serve_forever()
And run it with docker:
1
docker run -it --rm -v $PWD:/app -w /app -p 443:443 python:3.9 python cert_tester.py
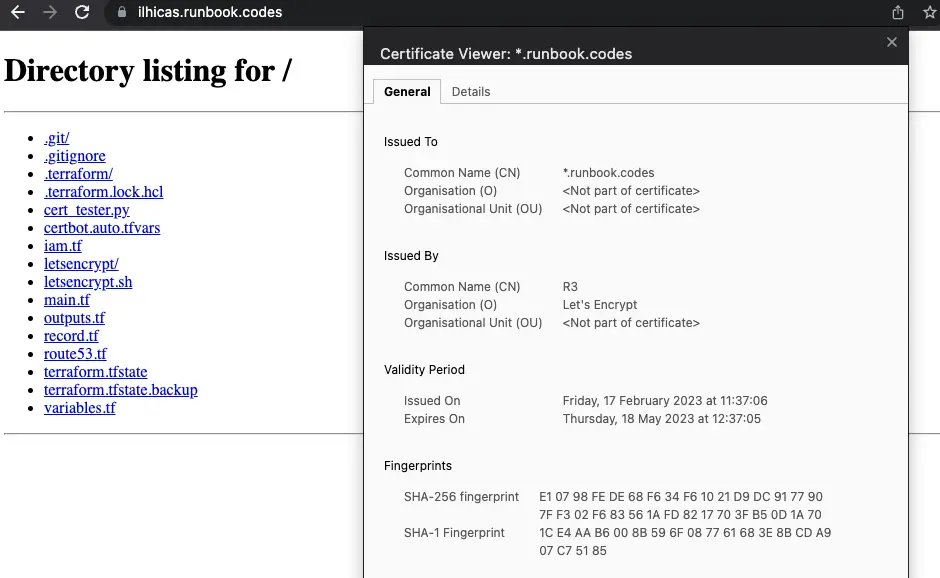
And if we now navigate to https://ilhicas.runbook.codes we should see the certificate working.
Which in your case would be https://<your_subdomain>.<your_domain> you should have a certificate working in your local development environment.
Just like seen in the image below:
Conclusion
In this post we have seen how to create a wildcard certificate for our domain using certbot and route53 dns challenge so that we can use it in our local development environment.
We have seen one of the ways to use the certificate in our local development environment, but there are other ways to do it, like using a reverse proxy like nginx or traefik.
In the next post we will see how to use the certificate in our local development environment using a reverse proxy like traefik with the certificate renewal process automated etc..
As usual, you can find the code in the github repo.
References
- https://certbot.eff.org/docs/using.html#dns-plugins